

1. Disable Extra Startup Programs
There are certain programs that Windows will start every time you boot up your system, and during the startup phase, they're all competing for a slice of your CPU speed. Extra or unwanted items in the startup list will definitely increase your startup time, perhaps by several minutes. Some common examples are things related to AOL, RealPlayer, Napster, instant messengers, and video managers. If you're not sure about an item, no big deal. You can turn it off, restart your PC, and see if everything seems to work. If not, you can
always go back and re-enable an item in the Startup list. This tip alone should speed up your start-up by 250%. Here are is what you have to do:
1. Go to Start button Run
2. Type "msconfig", without quotations
3. Hit enter key or click the OK button
4. A System Configuration Utility window will show up
5. Click the Startup tab
6. In the Startup tab you will see several boxes and some of them will selected (checked). All you have to do is to uncheck extra items that are of no use. If you run an antivirus program it is not recommended to uncheck it.
7. After making you choices press the OK button, you will be prompted to restart computer to apply changes.
8. After restarting your computer a dialogue will be displayed. You can check the option for not showing this dialogue every time your PC reboots.
2. Remove Spyware, Adware, and Malware
Have you scanned your system for spyware, adware and other unwanted pests? 1 of 6 computers has some sort of Spyware or Malware! They dramatically slow down your computer because they use resources to generate popup ads, send spam, and often interfere with the operation of good programs. If you haven’t scanned recently, we recommend a free scan from a good anti-spyware program. We prefer to use stand-alone, high quality anti-spyware programs like XoftSpy Pro, which give us the ability to scan and repair these problems in seconds. FINAL NOTE: Recent testing has shown that stand-alone programs do a much better job than the “all-in-one” packages (eg. Norton Internet Security) at detecting spyware, adware, and malware.

3. Optimize Display Settings
Windows XP can look sexy but displaying all the visual items can waste system resources.
To optimize:
1. Click the Start button
2. Select Control Panel
3. Double-click the System icon
4. Click the Advanced tab
5. In the Performance box click Settings
6. Leave only the following ticked:
a. Show shadows under menus
b. Show shadows under mouse pointer
c. Show translucent selection rectangle
d. Use drop shadows for icons labels on the desktop
e. Use visual styles on windows and buttons
7. Finally, click Apply and OK

4. Speed-Up File Browsing
You may have noticed that every time you open “My Computer” to browse folders that there is a slight delay. This is because Windows XP automatically searches for network files and printers every time you open Windows Explorer. To fix this and to increase browsing speed significantly:
1. Double-click on My Computer
2. Click the Tools menu
3. Select Folder Options
4. Click on the View tab.
5. Uncheck the Automatically search for network folders and printers check box
6. Click Apply
7. Click OK
8. Reboot your computer

5. Reduce Page File Size
Page file size is not constant by default. Due to this, the operating system has to resize the file each time more space is required. This is a performance overhead. All you have to do is to set the file size to a reasonable limit.
Follow the steps:
1. Right-click My Computer, Select Properties
2. Click the Advanced tab
3. Click the Settings button under the Performance section
4. Click the Advanced tab
5. Under the Virtual Memory section click the Change button
6. "Virtual Memory" dialogue box will appear (also shown in the figure below)
7. Highlight the C: drive containing page file
8. Select the Custom Size radio button and give same values in Initial size and Maximum size fields:
If you have less than 512MB of memory, leave the page file at its default size. If you have 512MB or more, change the ratio to 1:1 page file size to physical memory size.
9. Click Set, then OK buttons to apply the changes

6. Clean Your System Registry
Of course, the fastest and easiest way to speed-up your computer is to allow a software program to do it for you! Although you will find that all of the adjustments in this book will speed up your system, the most effective and easiest way to give your computer blazing speed is to clean up your system’s Registry. Your computer is like your car: it needs periodic maintenance to keep it running at optimum performance. Installing and un-installing programs, surfing the Internet, emailing, and other everyday activities create a sort of “sludge” that builds up in your computer over time, much like an automobile engine. After a while, it doesn't startup like when it was new, it stalls unexpectedly, and performance is sluggish on the (information) highway.

7. Run Disk Clean-Up
Both Windows and application programs tend to leave temporary files lying around on your hard drive, taking up space. A hard drive that is close to being “full” can cause Windows to slow down or interfere with efficient disk access and virtual memory operations. If you surf the web a lot, your temporary internet files folder can become quite large, causing Internet Explorer to slow down or malfunction. Cleaning up unneeded files, scanning for disk errors and defragmenting the hard drive can help to restore some zip to your system. Try to run once a month for peak performance.
1. Double-click the My Computer icon.
2. Right-click on the C: drive
3. Select Properties
4. Click the Disk Cleanup button (to the bottomright of the Capacity pie graph)
5. Select / check Temporary Internet Files and Recycle Bin
6. Click OK

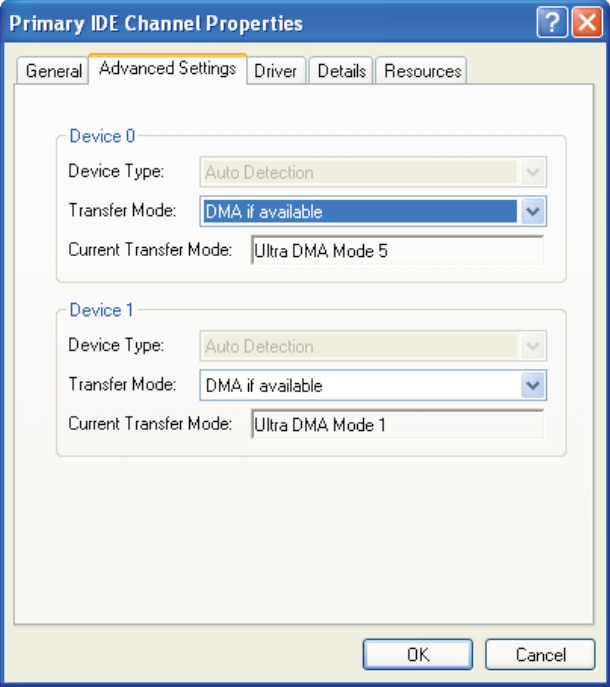
8. Enable Direct Memory Access (DMA)
1. Right-click on My Computer, select Properties
2. Select the Hardware tab
3. Click the Device Manager button
4. Double-click IDE/ATAPI controllers
5. Double-click on the Primary IDE Channel
6. Click on the Advanced Settings tab (as shown in figure) The tab may or may not be available for each option. It is only available in Primary and Secondary Channels.
7. Set the Transfer Mode to "DMA if Available" both for Device 1 and 0
8. Click OK
9. Perform the same operation for other items in the list, if applicable.
9. Disable File Indexing
Indexing Services is a small little program that uses large amounts of memory and can often make a computer endlessly loud and noisy. This system process indexes and updates lists of all the files that are on your computer. It does this so that when you do a search for something on your computer, it will search faster by scanning the index lists. If you don’t search your computer often, this system service is completely unnecessary. To disable do the following:
1. Click Start button
2. Select the Control Panel
3. Double-click Add/Remove Programs
4. Click the Add/Remove Window Components icon on the left side of the window
5. This may take a few seconds to load. Be patient.
6. Look for the “Indexing Services” component in the list
7. Uncheck the Indexing Services
8. Click Next
9. Click Finish

10. Remove Un-Used Programs & Files
You may have a bunch of software packages on your hard drive that are no longer needed, or they were gratuitously installed when you downloaded some other package. Toolbars, file-sharing programs, free email enhancers, online shopping "companions" and download managers are notorious for this practice. These
uninvited guests can put a big drag on your startup time, cause web pages to load slowly, and generally bog down your computer.
1. Click Start button
2. Select Control Panel
3. Double-click Add/Remove Programs icon
4. See what programs are installed that you don’t typically use
5. Select the Remove button for the ones you know you don't need
If you’re unsure about some programs, do a web search to learn about the ones that you need to keep.